Deploying a GO application to Google Cloud via Docker and Semaphore CI
20 Sep 2016Introduction
In this tutorial we will deploy a sample application (written in the GO programming language) to Google Cloud. We will package our application using Docker in order to make the final deployment as close as possible to the development environment.
Prerequisites
For this tutorial we will need
- A Docker installation
- An account for Semaphore CI (free registration required)
- An account for Google cloud (free registration required)
- Our favourite text editor and command line terminal to edit all related files
Note regarding docker on Windows
For this article I am using Docker on Windows. The recommended way to run Docker on Windows (or even Mac) is via the Docker toolbox. The Docker toolbox creates a “normal” VM on Windows and then runs the Docker engine on top, giving you access to containers. This means that things are a bit more complicated as Docker does NOT run on localhost (as it would be expected on a Linux installation).
You might see some slightly different screenshots on your system if you use Linux but the basic concepts are the same.
Source code for this article
You can find the source code mentioned in this article on Github. You can follow along either by creating a repository on your own and typing the source files yourself, or by simply cloning this repository to have everything ready.
Step 1 - Creating the Go application
First we will create our GO application. For the purposes of this tutorial we will start with a really trivial web
server that prints a hello message (plain text) when accessed on port 8080. Here is the complete GO file named trivial-web-server.go:
package main

import (
	"fmt"
	"net/http"
)

func indexHandler(w http.ResponseWriter, r *http.Request) {
	fmt.Fprintf(w, "I am a GO application running on Google Cloud.")

}

func main() {
	fmt.Println("Basic web server is starting on port 8080...")
	http.HandleFunc("/", indexHandler)
	http.ListenAndServe(":8080", nil)
}
For the rest of this tutorial we will mention [WORKDIR] as the root directory of our project. Choose any location that you see fit on your workstation for this directory.
Place the GO source file into [WORKDIR]/src/sample as per GO guidelines. You can choose any other name instead of sample if you like.
We also create the folder [WORKDIR]/bin that will hold the compiled binary.
Running the GO application via Docker
We need to run our GO application at least once to verify that it is working correctly. Of course we could install the GO development tools locally and run the application directly on our workstation. But this would beat one of the main objectives of Docker - having the same environment during development and during production deployment.
Thus we will instead run our application in a Docker container that will have the GO runtime installed. At the time of writing the current official Docker image for GO is golang:1.7.1. We will therefore launch it on our Docker engine and compile/run our sample Web application.
This image comes with the directories go/src and go/bin that already mirror our source code structure.
$ docker run -v /[WORKDIR]:/go -it -p 8080:8080 golang:1.7.1
root@05f0b7a68683:/go# ls src/sample
trivial-web-server.go
root@05f0b7a68683:/go#
The docker command runs a Docker instance of image golang:1.7.1, exposes port 8080 to the Docker host (or VM if you use Windows/Mac) and gives
us an interactive terminal inside the container. We also mount the folder that contains our source inside the running container. To verify
that the source code is available we run the ls command.
So now we have a Linux environment with the GO runtime available and with access to the source code. We compile and run our code:
root@05f0b7a68683:/go# go install sample
root@05f0b7a68683:/go# ls -l bin
total 5557
-rwxrwxrwx 1 1000 staff 5689610 Sep 21 22:15 sample
root@05f0b7a68683:/go# ./bin/sample
Basic web server is starting on port 8080...
Success! Our code is now compiled and runs as expected. To verify it really runs on port 8080 we can use our browser. If you use Docker on Linux
you can visit the localhost port directly. For Windows we need the VM ip that should be available if you run docker-machine ls on your terminal.
Here is the application running.

Now we are ready to create a Docker image of our application.
Step 2 - Packaging manually the application into a Docker image
Exit the container by pressing Ctrl-C and then Ctrl-D to get back to the Docker host prompt.
root@05f0b7a68683:/go# bin/sample
Basic web server is starting on port 8080...
^C
root@05f0b7a68683:/go# exit
$ ls bin/sample
bin/sample
Because we mounted the parent directory of bin we now have the GO binary intact left on the Docker host even though the container that compiled it is no
longer active.
The next step is to package this binary into a Docker image. We will use the same GO image we used for compiling, which will assure the correct functionality of our application when it gets deployed to production.
We create the following Dockerfile at the WORKDIR directory. As you can see it just takes the GO binary and runs it.
FROM golang:1.7.1
COPY bin/sample /go/bin
EXPOSE 8080
CMD ["/go/bin/sample"]
To verify the docker build, we create a sample image and run it:
$ docker build -t my-sample-image .
Sending build context to Docker daemon 5.772 MB
Step 1 : FROM golang:1.7.1
 ---> 002b233310bb
Step 2 : COPY bin/sample /go/bin
 ---> Using cache
 ---> 2eada3013b42
Step 3 : EXPOSE 8080
 ---> Using cache
 ---> f6bf1285d5a2
Step 4 : CMD /go/bin/sample
 ---> Using cache
 ---> 87d168345b83
Successfully built 87d168345b83

$ docker run -p 8080:8080 my-sample-image
Basic web server is starting on port 8080...
The application should again be available on our browser as before.
Even though we have successfully packaged our application into a Docker image, we need to automate the process instead of typing manually commands in the terminal. This will allow us to setup Continuous Integration so that each code commit results in an automatic rebuild of the Docker image.
Step 3 - Using Semaphore CI to automate the build process
Semaphore CI is a cloud CI service that can not only automate our build but also comes with Docker support built-in.
For public repositories it is completely free, so if we commit our code on a public Github (or Bitbucket) repository, we can easily setup a build process with only a free registration.
I have chosen Github for this tutorial and have connected Semaphore with my Github account as well, so that it has direct access to all my repositories.
Once we have connected Semaphore to Github we are ready to create a new build project:
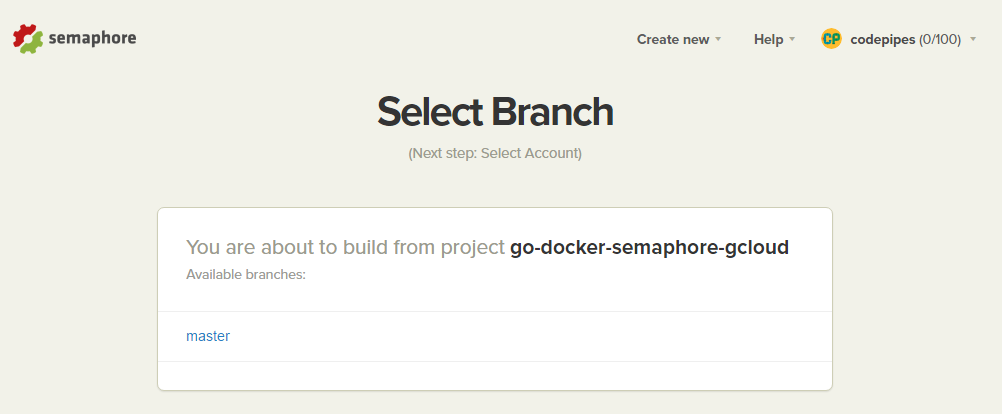
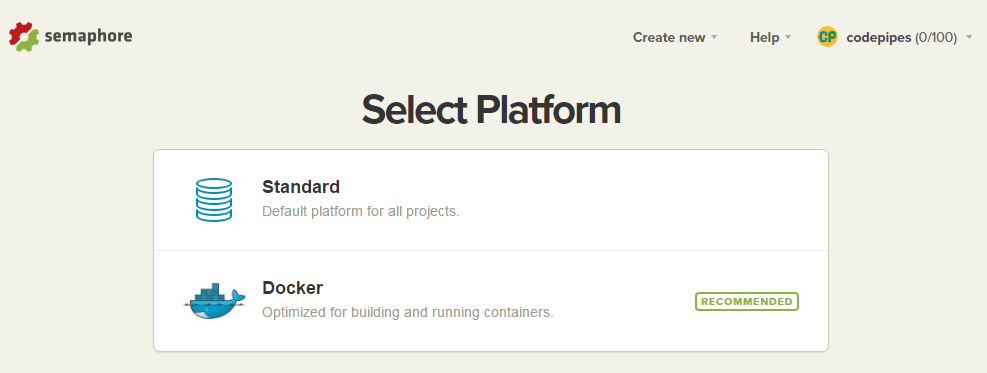
Semaphore will briefly analyze the contents of the repository and will automatically suggest the Docker infrastructure after noticing our Docker file in the root directory of the project. Very cool indeed!
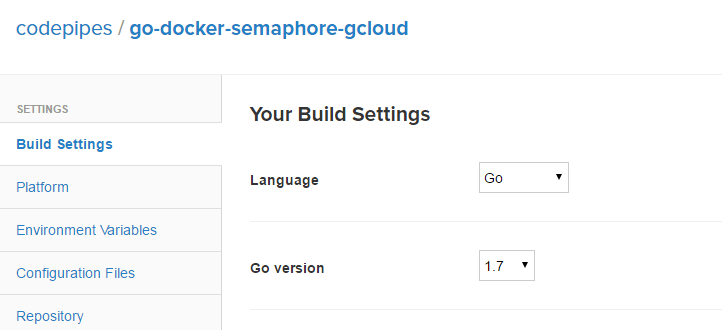
The first thing we need to declare is the GO version that will use for compilation. Naturally it should be as close as possible to our Docker image. Semaphore supports the latest version of GO directly from the dropdown menu making this step very easy.
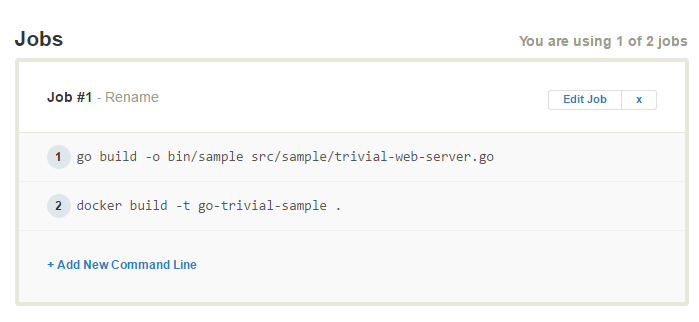
Next we should enter the commands that Semaphore will run after each code commit.
Here we enter two commands, one for compiling the GO source file and one for building the Docker image. (Semaphore has a different GOPATH
than the Docker image and thus we compile the file by directly defining the output file).
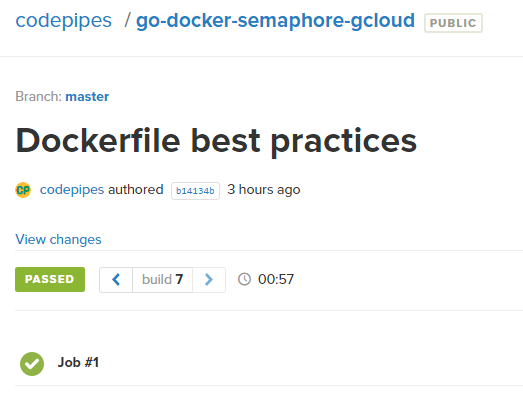
Once the configuration is saved, you can run your first successful build!
Speeding the build by caching the Docker image in Semaphore CI
If you run the build more times you will notice that the golang image is downloaded again and again.
Semaphore offers a cache mechanism for Docker images so that each build can skip the download step and find the cache right away.
To enable the cache we add the special SemaphoreCI command docker-cache restore before our build and the docker-cache snapshot command after our build.
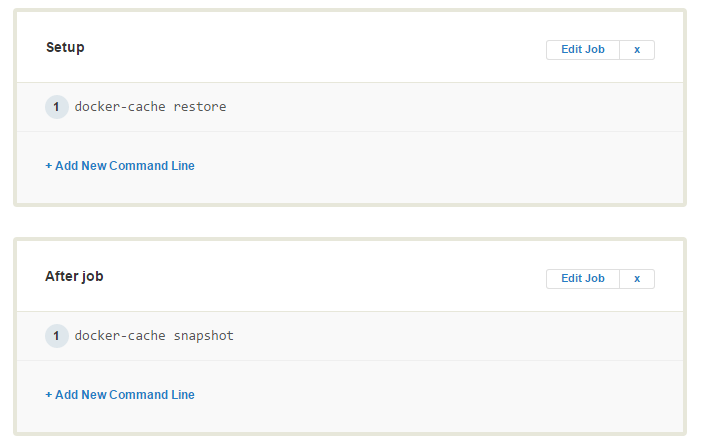
Now if you run your build multiple times you will notice that SemaphoreCI no longer pulls the GoLang image from docker hub but instead restores it from the build cache.
Step 4 - Pushing the Docker image to a repository
One of the most important tenets of CI is the “build once” rule. The same binary that gets built by our CI server will be sent to the test/staging/production environments. This assures the correct functionality of the system. Docker makes this very easy as we can simply keep the Docker image built by SemaphoreCI into a Docker repository after each build.
There are many options for a Docker repository. Since we work with Google cloud in this article it makes sense to use the Docker repository offered by Google called Google Container Registry. Naturally SemaphoreCI has also built-in support for pushing and pulling images to GCR.
To use the Google Container Engine you need a free Google Account. Specifically for Google Cloud you also need a credit card to enable a trial period. The credit card is used as a verification method and is not charged during or after the trial finishes.
If you don’t enter a credit card most of the functionalities described in the following sections are disabled.
Creating an external auth key for Google Cloud
Once you have billing enabled, locate the credentials section in the Google Console.
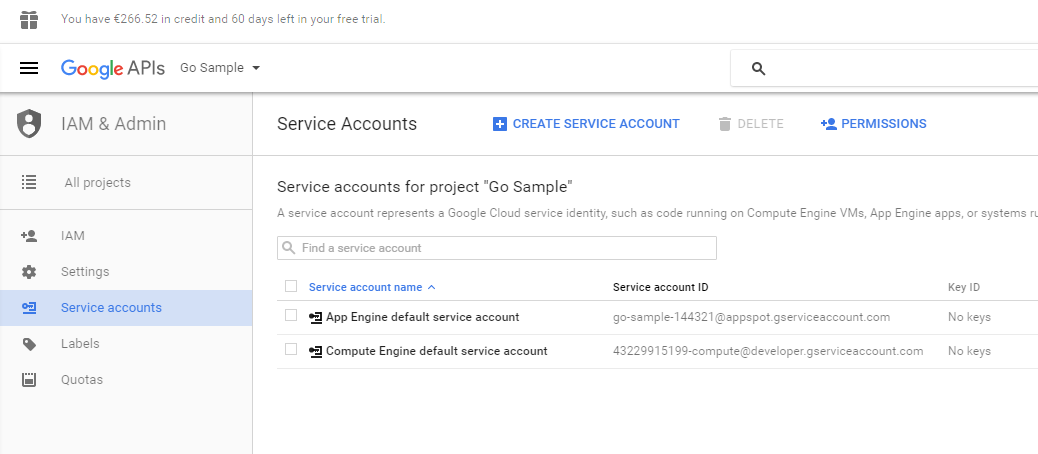
Select the “Create Service Account” button and fill-in the details. Make sure that you select the “Owner” role so that the service account has read/write access (which translates to pull/push for a Docker repository).
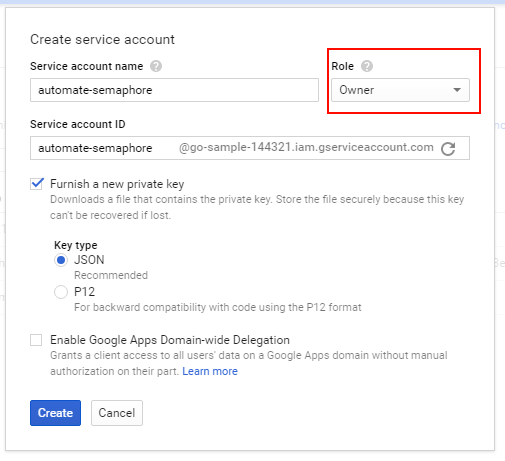
The browser will save a JSON file locally.
Authorizing SemaphoreCI to push images to Google Container Registry
Now that the JSON auth file is saved locally, open it and copy all contents to clipboard. Go the SemaphoreCI UI and select “add-ons” from the top right corner.
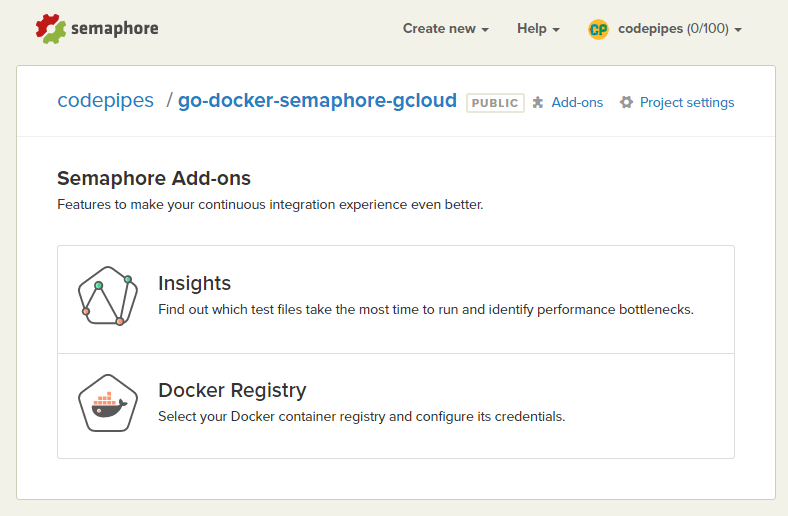
Select the docker registry option. Finally select the GCR entry and paste the contents of your JSON. Make sure that you also enter your Google account email.
Now you are ready to modify the build commands to send the final Docker image to the GCR registry.
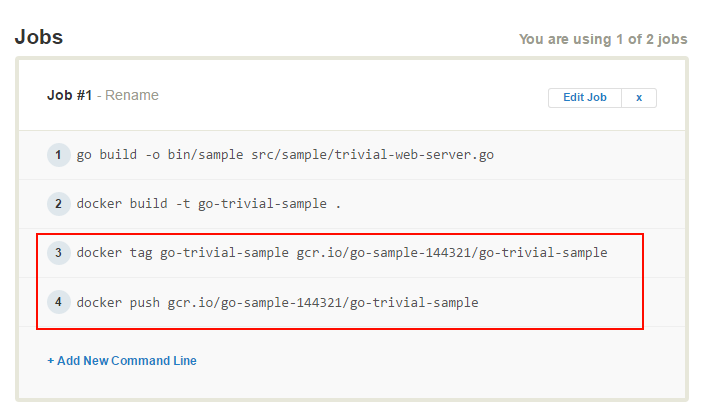
Run the Semaphore build again and if everything goes well you should see the image pushed into the GCR repository.

We now have our GO application dockerized and available in the Google Container Registry.
Step 5 - Deploying the Docker image to Google Cloud (Manually)
We now reach the most important step. We have compiled our GO application, created a Docker image and uploaded it to the Docker Registry. We need to deploy it to Google cloud to actually use the application.
There are multiple ways to deploy the application to the Google cloud. These include:
- Using a normal VM with Docker support. This is a bare bones method regarding functionality and without any official support.
- Using a Container Image. This method is more advanced as it supports cloud-init and other features.
- Using a full featured Kubernetes cluster for easy scaling and orchestration. This is the recommended option for real world production deployments.
For brevity reasons we will use the first method. On a real system you should spend some time however to understand how Kubernetes works and use that method instead.
Creating a VM and deploying a Docker image on Google cloud can be easily performed via the Google GUI console or via the integrated gcloud command line tool. Since we want to automate our build process completely we will use the gcloud tool (first locally and then in SemaphoreCI).
Authorizing the gcloud tool for external access
We could install locally the complete Google SDK to get access to the gcloud tool, but that would beat the whole purpose of using Docker in the first place. Thankfully there is already a Docker image that contains the SDK itself.
To authorize gcloud access we will reuse the JSON auth file we saved in Step 4.
First move the JSON file file to [WORKDIR] so that we can use it via docker. This is only temporary and will not actually commit the file anywhere.
$ docker run -v /[WORKDIR]:/work -it google/cloud-sdk
root@6a3a83386bd2:/# cd /work/
root@6a3a83386bd2:/# ls
Dockerfile  LICENSE  README.md auth.json  bin  src
root@6a3a83386bd2:/# gcloud auth activate-service-account  --key-file auth.json --project go-sample-144321
root@6a3a83386bd2:/# gcloud compute images list --project go-sample-144321
Activated service account credentials for: [automate-semaphore@go-sample-144321.iam.gserviceaccount.com]
root@6a3a83386bd2:/# gcloud compute images list --project google-containers
If everything goes well you should see a list of supported VM images by Google cloud. The ones we will use
will be named container-vm-v[date] (container-vm-v20160321-2 at the time of writing).
Deploying a Docker image on a Google Cloud VM (without using the Google Console)
Before we launch the Google VM we also need to tell it what Docker image it will launch. To set this up
create the metadata manifest called
my-google-cloud-manifest.yml with the following content:
apiVersion: v1
kind: Pod
metadata:
  name: my-sample-app-on-gcloud
spec:
  containers:
    - name: my-sample-app-on-gcloud
      image: gcr.io/go-sample-144321/go-trivial-sample
      imagePullPolicy: Always
      ports:
        - containerPort: 80
          hostPort: 8080
We also commit this file on the root of the git repository as it will also be used later by SemaphoreCI.
Finally we launch our image with the following command (from within the running Docker instance)
root@6a3a83386bd2:/#
gcloud compute instances create trivial-go-test \
    --image-family=container-vm --image-project=google-containers
    --metadata-from-file google-container-manifest=my-google-cloud-manifest.yml \
    --zone us-central1-a \
    --machine-type f1-micro --tags "http-server"

Created [https://www.googleapis.com/compute/v1/projects/go-sample-144321/zones/us-central1-a/instances/trivial-go-test].
NAME             ZONE           MACHINE_TYPE  PREEMPTIBLE  INTERNAL_IP  EXTERNAL_IP      STATUS
trivial-go-test  us-central1-a  f1-micro                   10.128.0.2   104.198.204.103  RUNNING
Once you run this command you should wait a bit until the VM is created for the first time. Once that is finished the docker image should be live on Gcloud. You can see it on Google Console:
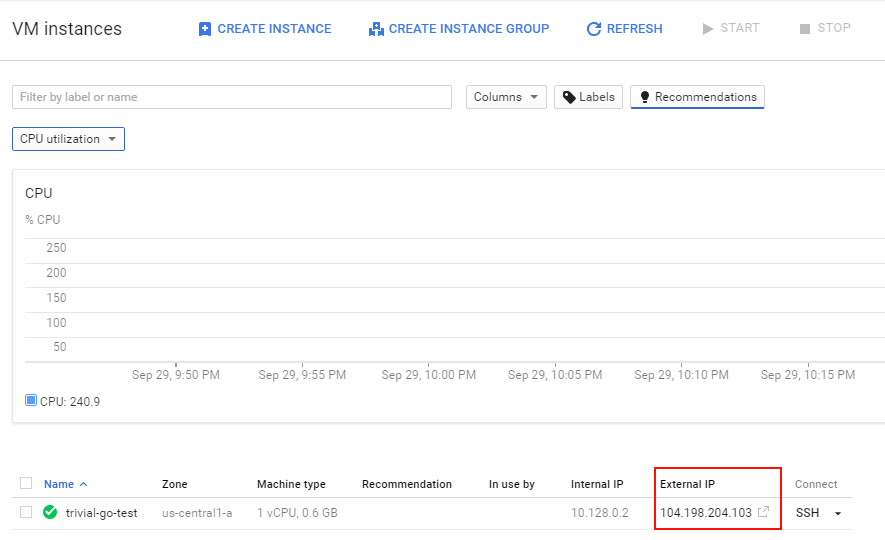
And also on your browser:
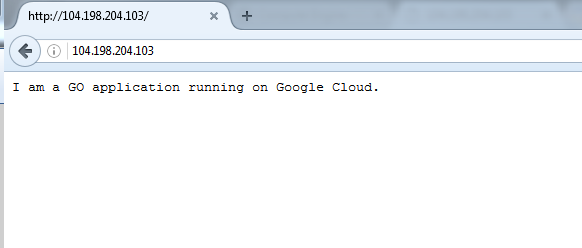
Now we have all the pieces ready to fully automate our build with SemaphoreCI.
Step 5 - Deploying the Docker image to Google Cloud automatically via SemaphoreCI
Remember that we use the gcloud executable outside Google Console and thus it needs to pass authorization.
We have a JSON keys that holds credentials but we don’t want to commit it to Github as it contains sensitive information.
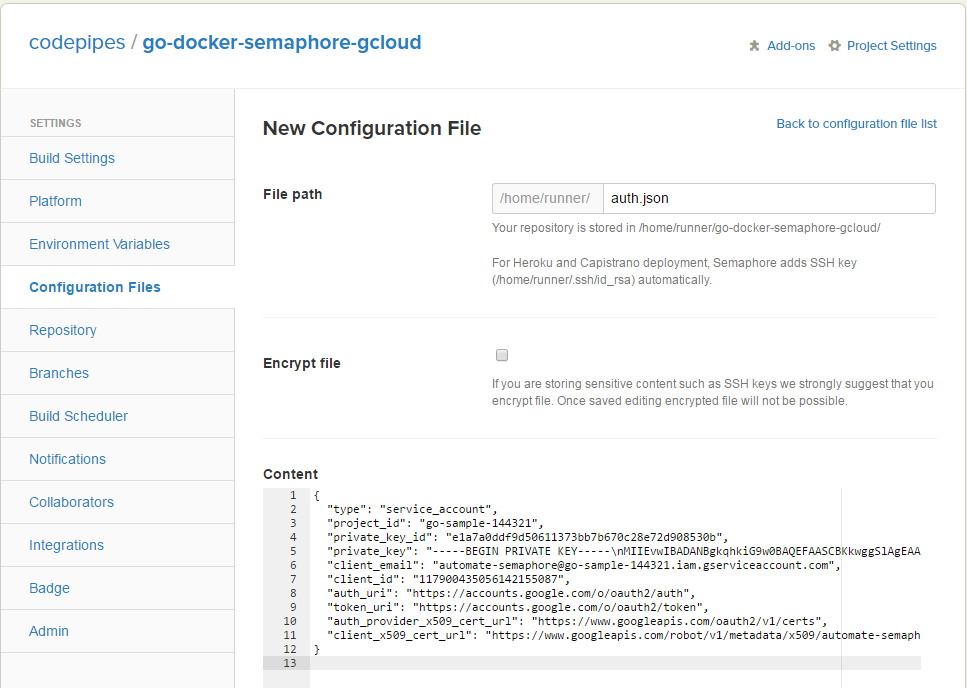
SemaphoreCI supports these kind of files very well in the project settings as custom configuration files.
Go to your SemaphoreCI project settings and click on Configuration Files. Paste the contents of the Google Cloud JSON
auth key. Semaphore will make the key available during our build so that we don’t have to commit to our repo.
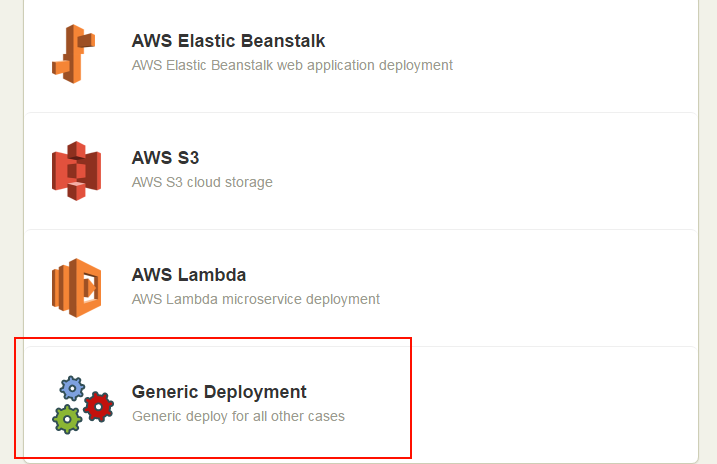
Then go back to the your project and click the Setup Up Deployment button. Select Generic deployment for the list (as Semaphore does not have native support for Google Cloud yet). On the next screen you will be asked about manual or automatic deployment.
I chose automatic to simplify things.
Then select the master branch and we are ready to enter our deployment commands. Since the build server on Semaphore does not have the gcloud tool built-in we have to install first. Then we re-deploy our Docker image.
wget https://dl.google.com/dl/cloudsdk/channels/rapid/downloads/google-cloud-sdk-128.0.0-linux-x86_64.tar.gz
tar zxf google-cloud-sdk-128.0.0-linux-x86_64.tar.gz
source google-cloud-sdk/path.bash.inc
gcloud auth activate-service-account  --key-file /home/runner/auth.json --project go-sample-144321
gcloud compute instances reset trivial-go-test --zone us-central1-a --quiet
Finally name your server with any name you want and start the build.
After it succeeds you will see your application live again (but this time it was deployed by SemaphoreCI)
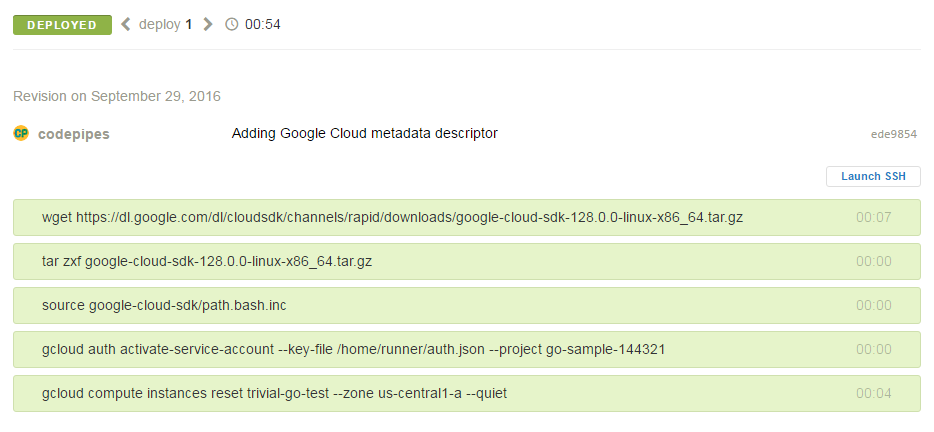
This concludes the tutorial! You now have a Dockerized GO application automatically built by SemaphoreCI and deployed to Google cloud.
If we change anything in our GO application, SemaphoreCI will instantly rebuild it after we commit our changes completing the CI pipeline. For example, I changed the string returned by the web server and after some minutes after my commit, it was live on Google cloud.

After you finish the tutorial don’t forget to stop the VM in Google Console so that no extra charges happen on your credit card. (You can
also stop the instance via the gcloud command line tool)
Conclusion
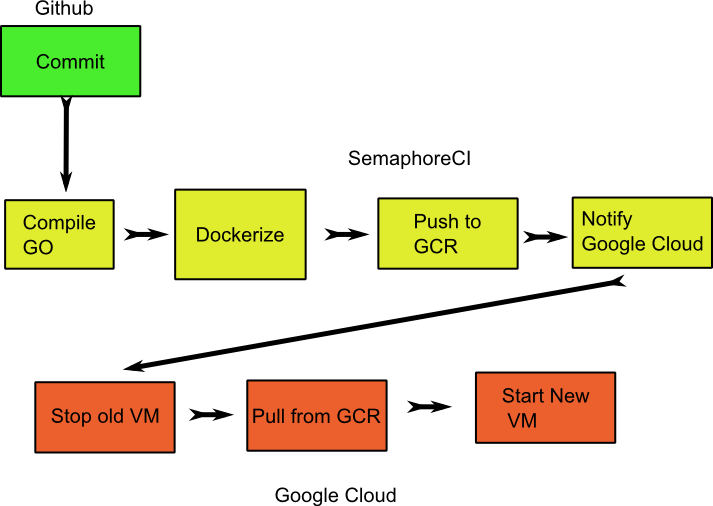
We now have a full Continuous Delivery infrastructure with SemaphoreCI. The whole process is as follows
- We commit our change to Github
- SemaphoreCI picks up the change
- SemaphoreCI builds our GO application and creates a binary
- SemaphoreCI packages the binary to a Docker image
- SemaphoreCI pushes the Docker image to the Google Container Registry
- SemaphoreCI notifies Google cloud that a restart is required
- Google cloud re-downloads the Docker image
- Google cloud stops the VM with the old Docker image
- Google cloud starts the VM with the new Docker image
Here is a graphical visualization of our complete Pipeline.
Where to Go from Here
I hope you found this simple tutorial useful. Some further pointers that you can explore are the following:
- The Golang Docker image we use is very big. We could try to slim it down by finding a smaller compatible image. This would make the push step much faster.
- Alternatively we could compile our GO binary as a static executable so that it doesn’t need the GoLang Docker image at all.
- A real application will have several other services apart from the webserver (for example a DB). This could be achieved with Docker compose.
- Instead of manually downloading the Google Cloud SDK on the SemaphoreCI build machine we could also use the Google SDK Docker image we used locally to make the build environment exactly the same as our local environment.
- As already mentioned you should not use single VM images in Google cloud for real applications. A Kubernetes cluster should be used instead.
The full source code can be found at the Github repository.
Enjoy!
Go back to contents, contact me via email or find me at Twitter if you have a comment.
