Spock testing framework versus JUnit
28 Apr 2017Spock is the newcomer in the test arena. The king of the arena is of course JUnit. Even though JUnit has served us well for the last 15 years, its age is starting to show. Spock comes with several fresh ideas that vastly improve unit testing.
In this post I will summarize 5 big differences between the two frameworks so that you can draw your own conclusions. If you wish to see more details about Spock, consult its official documentation.
Each of these areas will probably need a full article on their own to talk with more detail on the new features that Spock brings into the table. We will only scratch the surface for each one.
Consider this article a really quick tour of major Spock features. There is much more detail in each individual area and for brevity purposes it is impossible to cover everything in this single post.
1. Spock enforces a clear test structure
The number one reason for using Spock is to make your tests more readable. This may not seem important to you if you are just working on small projects created over the weekend. For big enterprise projects however test readability is a crucial factor when it comes to working on existing code.
JUnit tests lack formal semantics
If you look at any good JUnit test you will see a pattern in its structure. The structure is the well known arrange-act-assert pattern that clearly splits the test into three phases:
@Test
public void chargeCreditCard() {
    CreditCardBilling billing = new CreditCardBilling();
    Client client = new Client();
    billing.charge(client,150);
    assertEquals("Revenue should be recorded",150,billing.getCurrentRevenue());
}
The arrange phase sets up the needed classes. In the example above the first two statements are that phase (a client and a billing service are initiliazed)
The act is the trigger of the test. This phase should call the method(s) of the Subject under test. In our case that subject is the billing service. The trigger is the charge of 150 dollars.
The assert phase is the final one. It checks the actual result of the trigger with the one we expect. If they match the test succeeds. Otherwise the test fails.
The arrange-act-assert structure is only present if developers account for it
The example above is very simple so all three phases are instantly visible. One could improve the test even further by using blank lines as bellow:
@Test
public void chargeCreditCard() {
    CreditCardBilling billing = new CreditCardBilling();
    Client client = new Client();

    billing.charge(client,150);

    assertEquals("Revenue should be recorded",150,billing.getCurrentRevenue());
}
However in really big tests, these phases are not always evident. Imagine a large JUnit test with complex business logic. Seasoned developers will still demarkate the phase with comments in order to improve readability:
@Test
public void veryComplexLoanApprovalScenario() {
    //Prepare loan request and client details
    [...lots of statements here...]

    //Customer asks for a loan
    [...lots of statements here...]

    //Check that loan was approved
    [...lots of assert statements here...]
}
The usage of comments certainly makes the test more readable but this technique is far from ideal. First of all big JUnit tests are an anti-pattern and should be refactored using private methods that correspond to business needs. Secondly, not all developers put comments, and those comments are only accessible to programmers. (i.e. they never appear on test reports).
Spock tests make the arrange-act-assert structure explicit
Let’s rewrite the first unit test with Spock:
public void "charging a credit card - happy path"() {

    given: "a billing service and a customer with a valid credit card"
    CreditCardBilling billing = new CreditCardBilling();
    Client client = new Client();

    when: "client buys something with 150 dollars"
    billing.charge(client,150);

    then: "we expect the transaction to be recorded"
    billing.getCurrentRevenue() == 150
}
Even though this code is Groovy, I have kept it as close to Java as possible. The first thing you will notice is that the name of the method is full English text that clearly describes the test (more on this later). The second thing that you should notice is the set of given-when-then labels that split the code intro three parts.
It should be obvious that these blocks are directly mapped to the arrange-act-assert part of JUnit. The statements in the given block are the arrange phase, those in the when block correspond to the act phase, and the assert phase is handled by the then block in Spock.
There are two big advantages of Spock labels against using plain comments (like the JUnit example)
- The Spock labels are full English text that also appear on test reports (more on this later)
- The Spock labels have also semantic value
The second point is best illustrated with a bad example.
In JUnit test the arrange-act-assert pattern is implied
Let’s assume that a naughty Java developer modifies the JUnit test as below:
@Test
public void chargeCreditCard() {
    CreditCardBilling billing = new CreditCardBilling();
    Client client = new Client();

    billing.charge(client,150);

    assertEquals("Revenue should be recorded",150,billing.getCurrentRevenue());

    Client client2 = new Client();
    billing.charge(client2,100);
    assertEquals("Revenue should be recorded",250,billing.getCurrentRevenue());
}
This test is badly designed. The arrange-act-assert pattern has been broken. In this simple test, it is easy to understand what has happened. But in bigger tests the addition of extra asserts and setup statements makes the test very hard to read.
Spock can keep the test structure very clear
Spock has several other blocks apart from the basic given-when-then. They can be used to keep the structure of the test clear.
The naughty developer would not modify the Spock test in a similar way. Instead a better Spock test would be the following:
public void "charging a credit card - two transactions"() {
    given: "a billing service ready to accept payments"
    CreditCardBilling billing = new CreditCardBilling();

    and: "two customers with valid credit cards"
    Client client1 = new Client();
    Client client2 = new Client();

    when: "first client buys something with 150 dollars"
    billing.charge(client1,150);

    then: "we expect the transaction to be recorded"
    billing.getCurrentRevenue() == 150

    when: "second client buys something with 100 dollars"
    billing.charge(client2,100);

    then: "we expect the transaction to be recorded"
    billing.getCurrentRevenue() == 250
}
Here I have used the and block to merge the two arrange phases. Also the when and then blocks make the test have a natural reading flow. Just by reading the block names (given-and-when-then-when-then) one gets a good idea of what the test does.
2. Spock is much more helpful when tests fail
This is the killer feature of Spock that played a pivotal role on its adoption on my own projects.
Never trust a test you haven’t seen fail
–Colin Vipurs
The primary purpose of unit tests it to catch regression errors. This happens when a test that passed in the previous build, fails in the current build. It might seem counterintuitive but you want your tests to fail. A test that fails is a test that works.
Failures in JUnit tests always need a debugger
Unfortunately a failed JUnit test is usually the start of a debugging session as the information given in case of a failure is very basic. Here is a contrived example:
@Test
public void similarBooks() {
    Book book = new Book("The Murder on the Links");
    List<String> similar = book.findSimilarTitles();

    assertEquals("Murder on the Orient Express",similar.get(0));
}
Let’s say that the latest build of your project fails. You checkout the code locally, run all tests and get the following:

Just looking at this failure is not very helpful. You know which test has failed, but it is hard to understand how to fix the failure. In this example you need to run the test in a debugger to understand why you get a different value instead of the one expected.
Spock provides you with the surrounding context
Let’s say that you rewrite the same test with Spock:
public void "find books with similar titles"() {
    given: "A book that contains the word murder"
    Book book = new Book("The Murder on the Links")

    when: "we search similar books"
    List<String> similar = book.findSimilarTitles()

    then: "similar books should have murder in the title"
    similar.get(0) == "Murder on the Orient Express"
}
The test fails of course, but this time you get the following:
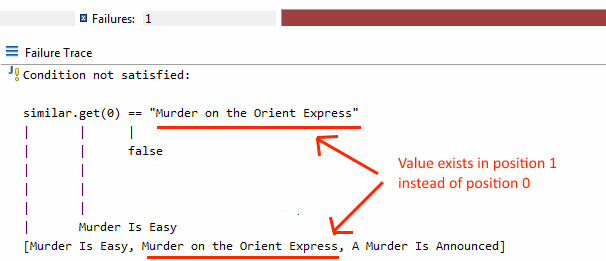
Unlike JUnit, Spock knows the context of the failure. In this case Spock shows you the contents of the whole list of similar books. Just by looking at the failed test you see that book title you search for, is indeed in the list but in the second position. The test expects the value in the first position and thus fails.
Now you know that the code fails because of an index change (or code that changes the order of similar books). Armed with this knowledge you quickly pinpoint the problem in a much faster way.
3. Spock tests are readable by non technical people
Naming of unit tests is a big problem in Enterprise applications. Developers usually think in technical terms never really showing any respect on how reports from tests are generated.
There are only two hard things in Computer Science: cache invalidation and naming things.
– Phil Karlton
Methods names in JUnit are constrained by Java conventions.
The classic mistake here is unit tests that really say nothing in their title. Here is a particularly bad example:
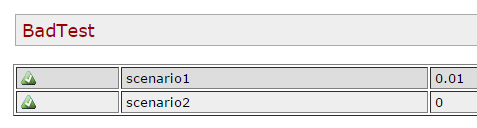
The problem with this naming “scheme” is that it is not helpful for people who do not have the code in front of them. If the test named “scenario2” fails for some reason, nobody but the developer can understand its impact.
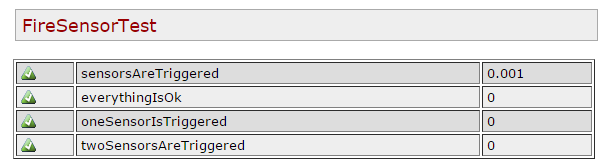
Seasoned Java developers attempt to name their unit tests with their true purpose. This is obviously better but still not perfect as they are constrained to the camel case (or underscore) format of the Java language:
Spock supports plain English sentences
The beauty of Spock tests, is the ability to enter full English descriptions in the method names (already showcased in the code examples in the previous sections)
Maven (and any other JUnit related tools) will format them with no extra configuration:
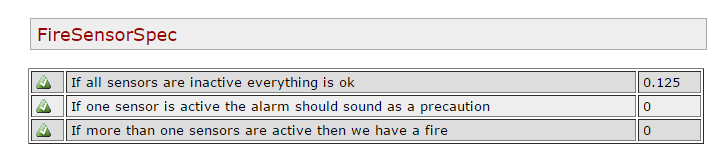
However Spock can take this report a step further. Spock has its own reports module that shows in the reports all text contained in the Spock blocks (i.e given, when, then). The result if the following:
This is massive improvement in the readability of Spock tests. Non-technical people can see this report and take proper decisions without actually knowing how Java works.
- Testers can read Spock tests and compare them against their own test cases
- Business analysts can read Spock tests and verify that they reflect the specifications of the system
- Projects managers can read Spock reports and understand the status of the system. They can instantly decide if a failed test has high or low impact.
4. Spock has a custom DSL for parameterized tests
A very common anti-pattern in JUnit tests, is a series of tests that are 99.9% same where only some variables really change. Here is an example:
@Test
public void acceptJpg() {
    ImageNameValidator validator = new ImageNameValidator();
    String pictureFile = "scenery.jpg";

    assertTrue(validator.isValidImageExtension(pictureFile));
}

@Test
public void acceptJpeg() {
    ImageNameValidator validator = new ImageNameValidator();
    String pictureFile = "house.jpeg";

    assertTrue(validator.isValidImageExtension(pictureFile));
}

@Test
public void doNotAcceptTiff() {
    ImageNameValidator validator = new ImageNameValidator();
    String pictureFile = "sky.tiff";

    assertFalse(validator.isValidImageExtension(pictureFile));
}
Those JUnit tests are clearly not DRY as they share a lot of common code. Actually all of them share the same test logic (pass an image to the ImageValidator class) and the only thing that changes is the filename and the expected result.
This is a better illustration of the similarity of these tests:
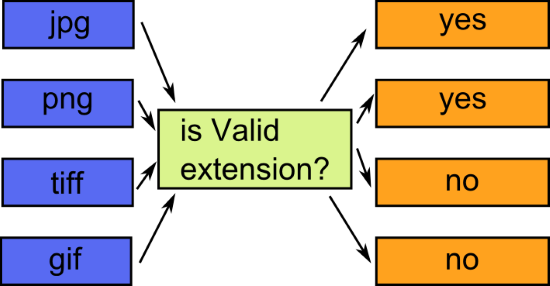
This type of tests are called parameterized tests because they share they same test logic and all scenarios depend on different parameters passed to that test logic.
Parameterized support in JUnit is very limiting and restricting
Parameterized tests with JUnit are possible, but the resulting syntax is certainly ugly. I challenge you to read the official documentation of JUnit. I will wait for you to come back.
If you have never seen the approach of JUnit for parameterized tests, do not worry. It should be clear that:
- it requires a custom runner (
@RunWith(Parameterized.class)) - the test class must be polluted with fields that represent inputs
- the test class must be polluted with fields that represent outputs
- a special constructor is needed for all inputs and outputs
- test data comes into a two dimensional object array (which is converted to a list)
- test data and test descriptions are in different placed
- you cannot easily use two tests in the same class.
Essentially the “solution” offered by JUnit is more trouble than its worth and this is why so many Java developers are not aware of JUnit parameterized tests.
I know that there are external libraries that augment the way JUnit handles parameterized tests, but their existence further enforces my argument that Spock is batteries-included unlike JUnit.
Writing parameterized tests in an intuitive way
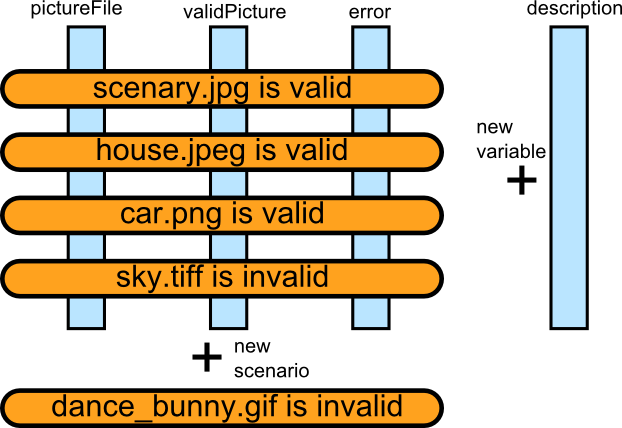
Spock can instead offer data tables that present the unit test in a much more understandable manner. Powered by its Groovy DSL it allows you to keep together data and its description in a tabular format:
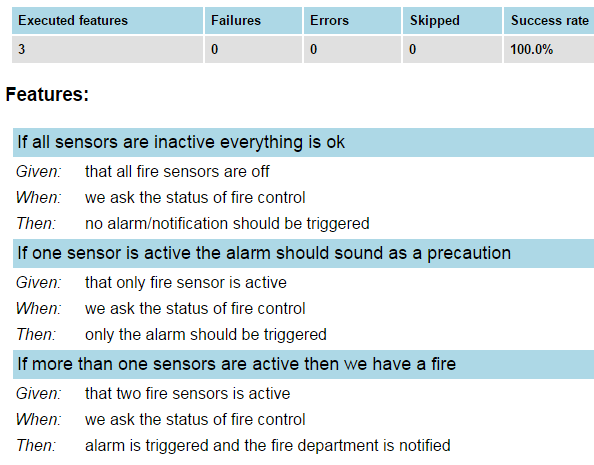
public void "Valid images are PNG and JPEG files"() {
        given: "an image extension checker"
        ImageNameValidator validator = new ImageNameValidator()

        expect: "that only valid filenames are accepted"
        validator.isValidImageExtension(pictureFile) == validPicture

        where: "sample image names are"
        pictureFile        || validPicture
        "scenery.jpg"      || true
        "house.jpeg"       || true
        "car.png"          || true
        "sky.tiff"         || false
        "dance_bunny.gif"  || false
}
Here you can see that 3 JUnit tests were consolidated in a single Spock tests with obvious advantages:
- There is no code duplication. The test logic is written only once
- All input and output parameters are gathered in a single place (the where: block)
- The names the parameters are clearly denoted at the table header
The flexibility of the Spock data table is even more powerful if you consider how this test grow over time. Adding a new test scenario is literately a single line addition. In the example above I have added two more scenarios for png and gif images with minimal effort.
Adding a new input or output variable is also very easy as you just need to add one more column to the table.
What is interesting also is the fact that if you run this single Spock test you will actually get multiple test runs (one for each test line) if you use the Spock Unroll annotation. Even better you can name each test run with any custom string so that each test run describes exactly what it does
@Unroll("Running image #pictureFile with result #validPicture")
public void "Valid images are PNG and JPEG files"() {
        given: "an image extension checker"
        ImageNameValidator validator = new ImageNameValidator()

        expect: "that only valid filenames are accepted"
        validator.isValidImageExtension(pictureFile) == validPicture

        where: "sample image names are"
        pictureFile        || validPicture
        "scenery.jpg"      || true
        "house.jpeg"       || true
        "car.png"          || true
        "sky.tiff"         || false
        "dance_bunny.gif"  || false
}
And here is the output result:
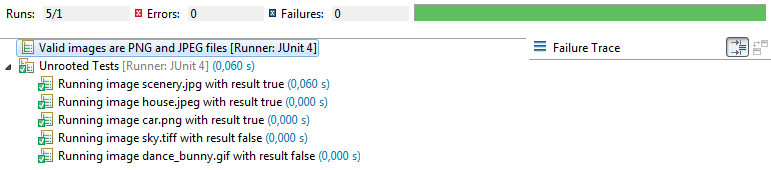
This is especially helpful with a large number of tests. If one of them fails it is essential that you can see on the test report which scenario failed (instead of failing the whole unit test method).
Spock data tables are the most basic form of parameterized tests. Spock also supports data pipes and even custom iterators for more powerful ways of dealing with input/output parameters.
In a future article we will explore all facilities offered by Spock for parameterized tests - as they deserve an analysis on their own.
5. Spock has built-in mocking and stubbing capabilities
When it comes to mocking, there is really no comparison against JUnit, as JUnit does not even support mocking. Until recently you needed a separate framework if you wanted to use mocking in your unit tests. Several mocking frameworks exist for Java, but lately the dominant one is Mockito.
Spock on the other hand wants to help you for all your testing needs by providing access to powerful facilities for mocks and stubs built-in into the base package.
Note: If you don’t know what mocking is, or have never used Mockito at all, then you should first read this introductory post about Mockito.
Basic Stubbing with Spock
Spock supports the typical Mockito mantra of when(something).thenReturn(somethingElse) with its own simpler syntax. Rather than introducing two new methods (when and then), Spock uses the >> operator which means “return that”.
As an example let’s assume that you are writing unit tests for a bank that approves loans. Here is the central logic
public class LoanApprover {

    public boolean approveLoan(Customer customer, long amount){
        if(amount < 1000){
            return true;
        }
        if(amount < 50000  && customer.hasGoodCreditScore()){
            return true;
        }
        return false;
    }
}
Here is the same unit test for both Mockito and Spock
//JUnit/Mockito Test method
@Test
public void goodCredit(){
    Customer sampleCustomer = mock(Customer.class);
    when(sampleCustomer.hasGoodCreditScore()).thenReturn(true);

    LoanApprover loanApprover = new LoanApprover();
    assertTrue(loanApprover.approveLoan(sampleCustomer, 10000));
}

//Spock Test method
public void "customer with good credit and loan of 10000 should be approved"() {
    given: "a customer with good credit"
    Customer sampleCustomer = Stub(Customer.class)
    sampleCustomer.hasGoodCreditScore() >> true

    expect: "an approval of the loan"
    LoanApprover loanApprover = new LoanApprover()
    loanApprover.approveLoan(sampleCustomer, 10000) == true
}
As you can see in this simple example, both Spock and Mockito work in a similar manner. The caret syntax in Spock combines the when/thenReturn syntax of Mockito.
It is interesting to note that unlike Mockito, Spock is clear about the nature of the fake object (i.e. stub vs mock). In this particular example we only query the Customer for a return result, and therefore in Spock we create a Stub instead of a Mock. The difference is subtle and will become more apparent in the following sections.
Every feature you love in Mockito when it comes to stubbing is also supported by Spock. I won’t get into details here but things like returning values multiple times, matching specific arguments or creating custom responses are very easy to implement with Spock (and usually in a simpler syntax).
Basic Mocking with Spock
Let’s say that our LoanApprover class was a bit more smart. Instead of reporting back with a boolean result if the loan is approved or not, it instead sends an email. Here is the code:
public class LoanApproverWithEmail {
    private final EmailService emailService;

    public LoanApproverWithEmail(final EmailService emailService){
        this.emailService = emailService;
    }

    public void approveLoan(Customer customer, long amount){
        if(loanApproved(customer, amount)){
            emailService.sendConfirmation(customer.getEmailAddress());
        }
        else{
            emailService.sendRejection(customer.getEmailAddress());
        }
    }

    private boolean loanApproved(Customer customer, long amount){
        if(amount < 1000){
            return true;
        }
        if(amount < 50000  && customer.hasGoodCreditScore()){
            return true;
        }
        return false;
    }
}
This time, we use constructor injection to use an external email service, which for our purposes has two methods called sendConfirmation() and sendRejection().
As our test method -approveLoan - is a void one, we cannot use a stub here to write a unit test. We have to mock the EmailService instead, and check what it does after our unit test has finished.
Writing a Mockito test is straightforward (assuming that you are already familiar with Mockito). Instead of using JUnit assertions, we need the Mockito verify directives.
@Test
public void lowAmountIsAlwaysAccepted(){
    Customer sampleCustomer = new Customer();

    EmailService emailService = mock(EmailService.class);
    LoanApproverWithEmail loanApprover =
        new LoanApproverWithEmail(emailService);

    //Loans that low will be accepted regardless of credit score
    loanApprover.approveLoan(sampleCustomer, 600);

    verify(emailService).sendConfirmation(sampleCustomer.getEmailAddress());
    verify(emailService,times(0)).
        sendRejection(sampleCustomer.getEmailAddress());
}

@Test
public void bigAmountsAreAlwaysRejected(){
    Customer sampleCustomer = new Customer();

    EmailService emailService = mock(EmailService.class);
    LoanApproverWithEmail loanApprover =
        new LoanApproverWithEmail(emailService);

    //Loans that high will be rejected regardless of credit score
    loanApprover.approveLoan(sampleCustomer, 75000);

    verify(emailService,times(0)).
        sendConfirmation(sampleCustomer.getEmailAddress());
    verify(emailService).sendRejection(sampleCustomer.getEmailAddress());
}
These two unit tests mock the EmailService class. Then after the loan is requested, we check the kind of email that was sent to the customer. If a confirmation email was sent, we know that the loan was approved. If a rejection email was sent, we know that the loan was not approved.
Just to make the unit test more strict, we also verify that indeed only one kind of email was sent to the customer. It would be very unfortunate for a customer to receive both a rejection and an acceptance email for the same loan.
In this particular case, the mocking of the email service was essential so that we also avoided sending a real email every time this unit test runs.
Now let’s see the same test with Spock:
public void "very low loan amounts are always rejected"() {
    given: "a customer with any credit"
    Customer sampleCustomer = new Customer()

    and: "an email service that is mocked"
    EmailService emailService = Mock(EmailService.class)
    LoanApproverWithEmail loanApprover =
        new LoanApproverWithEmail(emailService);

    when: "customer requests a loan lower than 1000 USD"
    loanApprover.approveLoan(sampleCustomer, 600);

    then: "a confirmation email is sent to the customer"
    1 * emailService.sendConfirmation(sampleCustomer.getEmailAddress())
    0 * emailService.sendRejection(sampleCustomer.getEmailAddress())
}

public void "very high loan amounts are always rejected"() {
    given: "a customer with any credit"
    Customer sampleCustomer = new Customer()

    and: "an email service that is mocked"
    EmailService emailService = Mock(EmailService.class)
    LoanApproverWithEmail loanApprover =
        new LoanApproverWithEmail(emailService);

    when: "customer requests a loan higher than 50000 USD"
    loanApprover.approveLoan(sampleCustomer, 75000);

    then: "a rejection email is sent to the customer"
    0 * emailService.sendConfirmation(sampleCustomer.getEmailAddress())
    1 * emailService.sendRejection(sampleCustomer.getEmailAddress())
}
In a similar manner with Mockito, the JUnit asserts are not used at all. Instead, a special Spock syntax is used for method verification. This follows the format:
N * mockedObject.method(arguments)
This line means: “after this test is finished, this method of mockedObject should have been called N times with these arguments”. If this indeed happened, the test will pass. Otherwise Spock will fail the test.
The syntax is a bit cleaner than Mockito because you don’t need special verify and times directives. The verification code is much closer to the actual Java code.
Also notice, that the mocked object is created as a Mock() this time, and not as a Stub() like the previous example. Spock makes it very clear for the reader which classes are instrumented with dummy results (stubs) and which are used for verification (mocks) while Mockito does not make this distinction.
Technically, the test will work the same in both cases, but for readability purposes the Spock approach is obviously better, especially for large unit tests where multiple fake objects are created.
Spock matchers (and why they are better than Mockito)
Let’s say that our email service also keeps a timestamp of when an email was sent. The two methods that sent email are augmented with this extra argument.
public interface EmailService {
    void sendConfirmation(String emailAddress, LocalDateTime when);

    void sendRejection(String emailAddress, LocalDateTime when);
}
Let’s also assume that this date is not known in advance. Maybe it is the current date, maybe it is the next working day, maybe it is the end of the week, we don’t really care. But we have to mock it.
Mockito offers several matchers for ignoring the exact values of arguments.
Unfortunately as you may already know Mockito does not support mixing matchers with actual arguments. Our first try with Mockito would be the following:
@Test
public void lowAmountIsAlwaysAccepted(){
    Customer sampleCustomer = new Customer();

    EmailService emailService = mock(EmailService.class);
    LoanApproverWithDate loanApprover = new LoanApproverWithDate(emailService);

    //Loans that high will be rejected regardless of credit score
    loanApprover.approveLoan(sampleCustomer, 50000);

    verify(emailService,times(0)).
        sendConfirmation(sampleCustomer.getEmailAddress(), any());
    verify(emailService).
        sendRejection(sampleCustomer.getEmailAddress(), any());
}
If you are a veteran user of Mockito you will know already that this test will not even run.
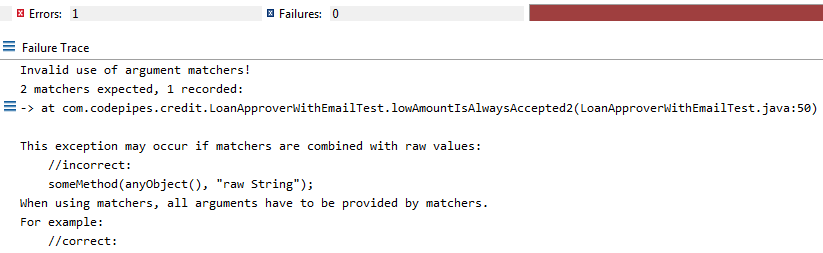
Here Mockito clearly tells us that we need to use matchers for all arguments. To overcome this limitation we
modify the unit test and ignore the first argument of the email method as well using the anyString matcher.
@Test
public void lowAmountIsAlwaysAccepted(){
    Customer sampleCustomer = new Customer();

    EmailService emailService = mock(EmailService.class);
    LoanApproverWithDate loanApprover = new LoanApproverWithDate(emailService);

    //Loans that high will be rejected regardless of credit score
    loanApprover.approveLoan(sampleCustomer, 50000);

    verify(emailService,times(0)).
        sendConfirmation(anyString(), any());
    verify(emailService).
        sendRejection(anyString(), any());
}
Now the test correctly runs. However it is not as strict as we want. Because the email address is now ignored we are no longer sure that the email address is correct and actually reflects the email address of the customer.
In this contrived example, this might not seem like a big problem, but in a real world unit test this Mockito limitation might let bugs slip into production.
Like Mockito, Spock supports ignoring method arguments and uses the underscore character _ to mark them. Unlike Mockito however, it does support mixing matchers with real arguments. So our original test that ignores the date but checks the email
is directly supported in Spock.
public void "very low loan amounts are always rejected regardless of credit"(){
given: "a customer with any credit"
Customer sampleCustomer = new Customer()
and: "an email service that is mocked"
EmailService emailService = Mock(EmailService.class)
LoanApproverWithDate loanApprover = new LoanApproverWithDate(emailService);
when: "customer request a loan lower than 1000 USD"
loanApprover.approveLoan(sampleCustomer, 600);
then: "a confirmation email is sent to the customer"
1 * emailService.sendConfirmation(sampleCustomer.getEmailAddress(), _ )
0 * emailService.sendRejection(sampleCustomer.getEmailAddress(), _ )
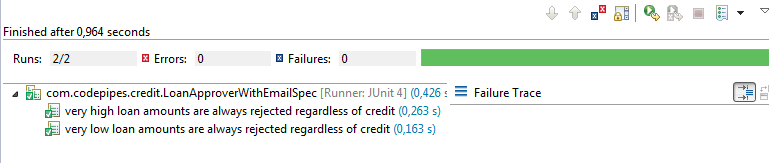
}This test runs correctly because Spock can indeed mix matchers and real arguments:
I consider this a big advantage of Spock over Mockito. The ability to define exactly what you want to ignore is an important pillar of strict tests. There is a a workaround with Mockito by using eq() matchers to expect a certain argument, but with Spock the code is much more clear and direct.
Spock has several other capabilities when it comes to mocking and stubbing, but these deserve a full article on their own. As always, more details can found in the Spock documentation pages.
Conclusion
This was just a small selection of cases where Spock makes your tests better. I have left out several other advanced features of Spock for brevity reasons.
Even if you are a diehard JUnit fan, you should acknowledge the advantages of Spock and what it means for your unit tests when it comes to size of code, readability and built-in features.
It should also be clear that Spock aims to be the ultimate solution when it comes to testing, covering the full testing lifecycle, without any additional libraries.
You can find some additional information in the PDF slides of my presentation for Spock versus JUnit.
Go back to contents, contact me via email or find me at Twitter if you have a comment.